Showing posts with label decorations. Show all posts

Dec 11, 2011

christmas decorations

christmas is my second favorite time to decorate the house (behind fall).  
the pictures are bad (took them at night-oops), but here is a glimpse into our decorations. 

the nativity scene 
(i heart the wise men sign-found a great one online, but they wanted 
$5 for the pdf file...decided to just make one myself).  i put one of those push lights in the nativity scene, it fell, so it doesn't light up very well..boo hoo)


the wall that i can change out for the seasons.  those are turquoise blue ball ornaments in a glass container on the table.  surrounding it are scrap pieces cut from the bottom of the christmas tree.
 addison's snowman art
 these are just snowflake tree ornaments hung from a frame with no glass in it.

the christmas tree...this is the top of it.  
i went for the silver and light blue look, with mostly ball ornaments and a light blue ribbon woven around.  i also added some starfish in it to give it a beachy feel...
nice little saving tip:  we bought the 5-6 foot tree for $20 and placed it on a stepping stool to raise it about a foot...i put some green burlap and a tree skirt at the bottom and the girls decorated with some of their dolls and stuffed animals.  anyway, it saved us $10 on the tree and it looks great.


the mantle
i wanted to go for the natural look, so i used twig balls, white lights, white candles with twine, and some white/gold/silver sprigs of eucalyptus (plastic ones from michaels). 
and the stockings were hung by the chimney with care...


 to hang the stockings i used the removable hooks from 3M and bought these little frames at michaels last year-put each family member's picture in one.  
sad this year not putting kona's stocking up-RIP :(

 the advent calendar
these are made from envelopes cut in half.  each has a number on it that corresponds to the dates in december.  the envelopes are filled with a couple of verses telling the story of jesus' birth (taken from luke 2), along with an activity for the family (read a story, color a picutre, watch a christmas movie, etc).  i blogged about it last year, but i can't find it right now

merry christmas!

Oct 25, 2011

halloween crafts

CRAFT #1:
MODGE PODGE PUMPKIN CANDLES
as is usually the case come mid-september, when the realization that summer is over, i can't wait to start doing fall crafts with the girls.  i found this one on the cover of some magazine in my teacher's lounge at school (i think it was women's day).  it was so easy, even with a 3 and 4 year old.

materials:
  • modge podge
  • glass container (i used recycled jars)
  • paint brush
  • orange tissue paper
  • black construction paper
directions:
  1. cut small strips of orange tissue paper
  2. pour small amount of modge podge in container (i added some water to dilute)
  3. brush some modge podge on the jar and start placing the tissue paper
  4. at the end you can cut out a face with the black construction paper
this was quite fun and looks really cute at night when there is a candle inside.  enjoy!


CRAFT #2: 
DECORATING YOUR TRICK OR TREAT CONTAINER

aside from using a pillow case (which we will reserve until the girls are older and i really need LOTS of candy), this is quite possibly the cheapest (and most fun) way to prepare for trick or treating.  i was at the dollar tree (our favorite store) and found these orange pumpkin containers.  i thought it would be cute to buy them for the girls for halloween to trick or treat.  then...low and behold...right next to them were these glow in the dark halloween stickers...  stickers are the next best thing to sliced bread in my house.  i thought this could entertain the troops while i made dinner one night.  they had a blast and for a change, i didn't care where they put the stickers.  i even wrote their names with a sharpie, to eliminate future fighting...oh, yes!


Jun 30, 2011

thrift store goodies

even on vacation my little crafty brain is working.  while in desert springs, i spotted a thrift store, which i knew i had to stop in and take a peek.  it was owned by a local church and filled with all kinds of goodies.  since i had the girls with me i wasn't able to look around as i would have liked, but i did find a few goodies.  i only currently have pics of the one find.  i'll post the others later.  

this was a random box with fake grass and moss balls stuffed inside.  i was immediately drawn to the old aged white wood (don't you just love it)...it was only $3 and i think i even got 40% off that day too.  i saw such potential in this poor little neglected box someone found no more use for.  little box, i will give you new life in my house...

this is what it looked like before i had at it with a screw driver, razor blade, and hammer...oh yes...not as easy as i had thought...but definitely worth the hard work.


and this is the after...it is such a cute vintage looking box...aged to perfection in the paint job.  it currently lives on my coffee table, housing a few candles and a succulent.  she may move to another room, but for now, i like her here.  any suggestions on what to fill her with???


fake desk drawer deco

i recently saw another cool idea in one of the many blogs i stalk frequent (sorry, i can't remember the blog-i know, i need to better about this).  they were using old drawers for decorations.  since i don't have any spare drawers around my house, i thought i'd make one.  it was quite simple, since my husband leaves spare pieces of wood sitting around our garage.  beware hubs: nothing is safe in our garage when i am on a creative streak. 
and then finally....after all the assembling and waiting time 
(usually i am so impatient, i am surprised i waited long enough)....
you have the finished "drawer-not-a-drawer"...thing!

oh, i also glued an extra crystal knob that broke to resemble a handle...
FYI...hot glue does not really hold very well...i have re-glued it about 5 times...argh!!


Jun 6, 2011

material remnants pennant

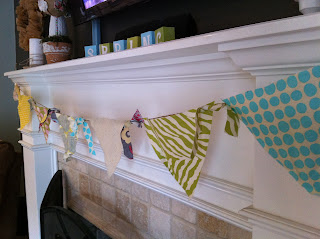
i saw a material pennant on another blog and thought it would be so cute to replicate.  i have plenty of cute material remnants, so i cut some up and popped them on some twine.  i think it is adorable.  my lovely hubs on the other hand (and my cousin too) think they look like hanging underwear or bathing suit bottoms.  boo hiss!  i disagree!  i think they are cute for my spring/summer mantle.  
maybe they are a little too wide...hmm.  but i'll never tell them that!


here is the mantle from a front view.  the "spring" blocks in the middle can be flipped to spell "summer."  
p.s. do you love the NBA play off game in the background (compliments of the hubs)

angela's baby shower

one of my friends just recently had a baby boy, isaiah james.  i, along with a few other friends, had the privilege of throwing her a baby shower.  it was such a fun shower to throw because there were only 9 people.  i have always thrown such large showers and have never really been able to do all the cutesy little things i love to do because on a large scale they would cost so much.  anyway, it was a quaint luncheon in my backyard.
(thanks for the pics, beck @ beckyfisherphotography)


Feb 1, 2011

valentine craft #1-the cupcake liner wreath

let me first say that i just love all the random holidays-like halloween and valentine's day.  i think it is related to candy and colors-orange and black and pink, red, black, purple, chocolate, candy hearts, etc.   even when i was single, i still loved all the colors and the candy hearts-not the reminders that i was single.  i heard someone at work call valentine's day "singles awareness" day.  i thought that was hilarious.  so, sorry if this offends anyone :)
i wanted to make a few crafts to decorate for the holiday.  i found this wreath at tatortots and jello (you really must check it out, but if you do, you'll see that hers is MUCH better than mine).

the finished product, hanging on the door!

materials:  foam wreath, red ribbon, cupcake liners, hot glue gun

step #1:  wrap the ribbon around the foam circle-it is actually pretty easy and i didn't have to glue it on-just at the end.  i ended up running out of ribbon, so i decided to, instead of taking another trip to michaels, just put ribbon on part and the "exposed" green part would be where i would put the cupcake liners.  the example one has the liners all the way around and it really looks good.

step #2: take the cupcake liners and bend or fold them two times.  i folded about 5 to 10 of them before gluing

step #3: glue on the liners-which sounds easy and it is...just arrange them and fluff as you go

it really goes pretty quickly if you fold enough at a time

here is little boo, modeling in front of the finished product-i have a feeling i will end up adding the liners all the way around for my next one-hmm..what's next??? st. patrick's day!  green it is!