Showing posts with label sewing. Show all posts

Jul 2, 2013

get your craft on-pinterest style

i just love pinterest...and i try to emulate the recipes, crafts, hair designs, nails, etc that i repost.  i saw this reading nook on one post and knew i wanted to make it.  the problem was where to put it in the girls' room.  i finally decided the only place would be in the closet doorway.  off to hobby lobby to buy material and a tension rod.  i sewed (and boy do i use that term loosely) a little seam in which to place the tension rod through and viola!  the reading hide out was finished...the girls are so excited and don't care that i didn't sew the seams all around..shh...don't tell them-they think it is just about the greatest thing.


Jun 30, 2011

4th of july projects, part 1

if you know me...i LOVE decorating for holidays...it is definitely the teacher in me!  i have been scouring blogs for the cutest projects and have come up with a few of my own too.  here is a sampling of a few of the first batch.

turn a boring entry...
into a patriotic cute one with a few pillows and flags..


what to do with all of those flags....
make a garland


i found some cute patriotic subway art here.  printed it, framed it, viola!  adorable-ness.  
i also painted a few blocks red and blue and added stars and stripes and then spray painted a 
starfish red-what a concept...looks so cute.
p.s. don't you love the old sewing table...scored a free roadside find in my neighborhood.  sweetest old german woman left it on the yard and let me take it...


Nov 14, 2010

old school leg warmers

i wish i could say that i am creative enough to have come up with this craft on my own, but sadly, that wouldn't be the truth.  i came across it at a blog called calico and realized i could make these for my girls.  i looked through my sock drawer and found two pairs of socks that i don't wear very often and thought i'd test it out (thank you stephen and sarah for the pink moose pair-addy girl loves them).  they turned out so cute.  if you click on the link HERE you will find the tutorial.

BEFORE:


CUT:

SEW:

 AFTER:


Apr 12, 2010

the new jean skirt (repurposed jeans)

BEFORE                                                             
                                 AFTER


cut off the legs of the jeans (make sure you don't cut too much off..leave room for error, just to double check, i also held up one of my daughter's skirts to make sure i wasn't cutting too much off).


cut up the inside seams of the legs and then also cut "open" the...um, crotch (what better word is there?:>) to make it skirt-like.
a) at this point you will most likely want to shorten the skirt and try to even it out with your scissors (oh, is that too obvious?).  i left myself plenty of room when first cutting off the legs, so i needed to cut quite a bit.  i also noticed that if you turn the skirt over and look where the crotch seam stops on the bottom of the back of the skirt, it will serve as a pretty good indicator of where to cut to shorten your skirt.
b) turn the skirt back over to the front side and cut both sides of the seam to create a slit in the front-  this will create the "peek-a-boo" with the other fabric.


pin the fabric into place and then go around the bottom hem of the skirt and pin (this served as a straight guide for me as i sewed a seam to stop the fraying after washing).  then sew around the skirt.  you can finish the edges if you would like, but i left it unfinished so it would fray a bit after washing and give it that vintage look.  oh, one thing i learned after making and washing the first skirt was to put the seam/stitching very close to the edge of the skirt or to at least cut it up pretty close to the seam/stitching.  after washing the first one i realized the places that had fray right next to the seam looked cuter.  i suppose the fray will eventually make it's way all the way up to the seam, but i guess doing it this way cuts out a few washings to get that look.  take it for whatever it's worth.


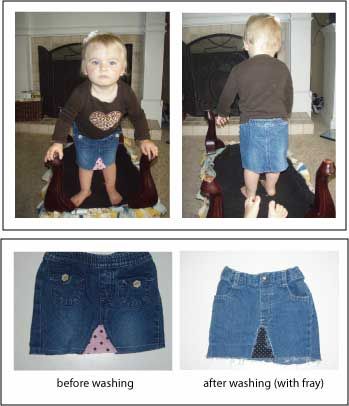
once you have sewn the edges, wash and enjoy!  i think on the next few skirts i make i might even add some more embellishments, such as flowers or ribbon or something.  this is what it will look like after you sew and before you wash it.  PLEASE, PLEASE don't look too closely at the uneven seams or uneven skirt.  i am not a seamstress, as i just bought my first sewing machine two weeks ago.  i am still getting the hang of using it and learning what a straight line looks like ...hahaha! i am sure those of you who can sew will do a much better job.  check out the pics below of my two year old modeling it.  she even turned around to show you the back...keep in mind that i haven't washed it yet to create the fray at the bottom .  i included the first skirt i made and have already washed so you could get an idea of what the fray will look like.


toddler capris (repurposed jeans)

if you have any jeans that are old or too short or you just don't like them, then this is the project for you!  you don't even need a sewing machine, although it does make the process go faster and easier.  for this project there are only 3 simple steps:  
1) cut the jeans the length you want the new shorts or capris to be (you can finish the edges off, but you don't have to, you can leave them "rough" and put the ribbon on over it)
2) pin on some ribbon around the edges of the new length (i pinned on the top and the bottom of the ribbon to keep it in place as i sewed)-the thicker (and more elaborate) the ribbon the better-more elaborate ones hide the stitching.
3) sew the ribbon on (this part was actually a little harder for me because the leg of the pants are so little, so it took some serious maneuvering.
i had sew (hee hee) so much fun making these and i think my daughters better will enjoy wearing them!  have fun!